Showing posts with label pepper. Show all posts

Wednesday, January 15, 2025

Pea Salad (short)

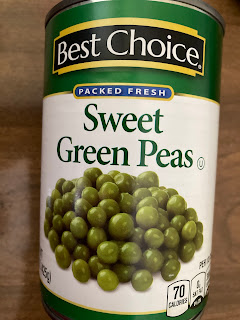
 I was given a bag of canned goods as a Christmas gift. You never know what you're going to get. Among the cans given were 2 cans of  Sweet Green Peas.


I wasn't familiar with the brand and sweet green peas are not on my yummy list. However, I was not going to discard them. If I didn't use them I'd give them away.

Luckily, there was a recipe on the back label. I've never had pea salad but judging from the recipe,  it contained many of the same ingredients as in potato salad, pasta salad and broccoli salad. I like all of those. 


This is the outcome of the recipe. It was delicious and I will be making it again. It doesn't hurt to try out something new...in most cases.😉

Wednesday, February 22, 2023

Roasted Cauliflower ,Stems and Greens


We all know that grocery prices have skyrocketed. This small head of cauliflower was $2.69 at ALDI.
 

After removing the core, leaves and stems  and saving them, I broke the cauliflower into florets trying to keep them about the same size.  

I tossed the florets in olive oil seasoning with Mrs. Dash, paprika, basil and  garlic powder. Regular salt and pepper will do the trick but, I'm trying to cut back on my sodium intake.

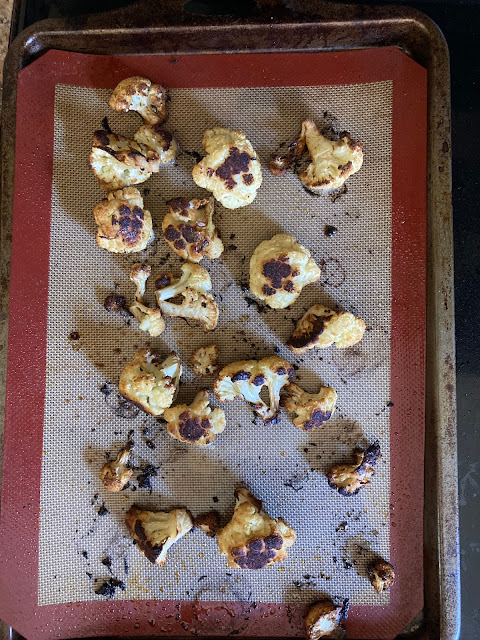
Placing the florets on a heat proof mat sprayed with cooking spray, I placed them in the oven on 400 degrees for about 20-25 minutes. I checked periodically to make sure they weren't burned.
I removed them from the oven, waited for them to cool off enough to eat and dug in. OOOO-delicious. As you can see there weren't many. That browning on the tips is not burning. It adds so much flavor.  I dipped 3 of them  in a tiny bit of Ranch Dressing just to see how it would taste. OOOO-delicious again. 

Next time I'll break them into smaller florets. That way they'll cook faster with even deeper flavor. It'll also appear as if I have more than I do. 😀

But, wait. There's more!
I wanted to know if the leaves and stems were edible. I Googled "cauliflower leaves and stems".

Yes, they are. After all I did pay for the w-h-o-l-e thing and I want to get my $2.69 worth.  I found numerous recipes online. They can be used in soups, stir fried, stocks, salads and even made into cole slaw.

That's what I did with the first cauliflower. The stems can be a little tough but if you peel them the inside is perfect. BUT!, I didn't peel them. After washing the greens and stems thoroughly, I finely chopped everything so that it would be more digestible.

 I put these fixings in a bowl, added mayo,  sweet pickle relish, a little cheese for color along with seasonings of choice and began my consumption.  It was good enough for me to want to make coleslaw with it again. Some of the recipes showed additional ingredients but I preferred to keep it simple. 

I stir fried the next batch along with white onion and seasonings. I added cooked chicken and a little sweet and sour sauce.  It was tasty. 

I didn't add a lot of "stuff" to my recipes since it was my first time trying it out. I didn't want to be disappointed if it didn't turn out to my liking and I would have wasted the additional ingredients for nothing.


That's it ***


Monday, February 17, 2020

Oven Roasted Parmesan Brussel Sprouts


Not everybody likes brussel sprouts. I mostly have them steamed. So far I haven't had them in a slaw or fried. Here in the south  we fry just about everything.

I've got to say this alternate form was easy and delicious.


This recipe is from Together As Family

Ingredients

  • 1 1/2 lbs brussel sprouts (trimmed & halved)
  • 2 tablespoons olive oil
  • 1/3 cup parmesan cheese
  • 1 teaspoon garlic powder
  • 1/2 teaspoon salt
  • 1/4 teaspoon pepper

Instructions

  1. Heat oven to 425 degrees. Very lightly spray a cookie sheet with cooking spray.
  2. In a bowl, combine brussel sprouts (that have been halved and ends trimmed) with the remaining ingredients. Toss together to coat all the brussel sprouts.
  3. Spread onto the cookie sheet making sure they are not touching.
  4. Cook for 16-18 minutes. Serve immediately.

I gathered the items and ingredients I'd need. 


Rinse and pat dry before cutting in half. You want ROASTED not STEAMED, I chose not to cut off the ends since they'd already been done. Plus cutting off the ends causes the sprout to unravel into brussel sprout leaves instead of halves. Although, I found out later that those crispy leaves can be mighty tasty.

Here are some of the sprouts halved. It's important to halve them so that the seasoning can get all the way through.

Into this bowl I added all of the ingredients and mixed them with my hands. 


I laid out the sprouts face down on parchment paper making sure they didn't touch. 
Here the sprouts are out of the oven. No, the Parmesan is still white because for one thing it's the cheap kind in the green container and  because I forgot to add it. So, I sprinkled on the Parmesan and ran the whole cookie sheet back into the oven for a few minutes. Turned out great.
No, these aren't burned.  You want your sprouts to have a char on them. Remember me saying the leaves are tasty and crispy?  I found myself examining the sprouts, tearing off the charred leaves and eating them.  I'm assuming it's very similar to the way kale chips turn out. 

This recipe is now in my Favorites file.
That's it***


Saturday, April 13, 2019

Decorative Ribbon Tassel- Part 1

(13 pictures)


I wanted a decorative tassel to hang on the corner edge of a new single sleigh bed I bought, just in case I have an overnight visitor.
The type of  tassel I wanted can be expensive.   Being the creative and frugal  person that I am, I put on my thinking cap and tried to figure  it out.

I was inspired by the DIYs of tassels made from salt shakers such as the ones below.
Curiouspeddler.com

DancingBearTassels on Etsy


  So of course I scoured thrift stores to see what I could find.

On a whim I bought this ceramic 49 cent dinner bell, which is about  2.5 inches high and 2 inches wide. I was thinking I could remove the clapper and stuff the tassel inside of it. But, then I realized I wanted more color. It had the green of the walls in the room but not the turquoise I wanted to also use, so 49 cents gone. I'll figure out something else to do with it.


 Hobby Lobby was next, and thank goodness for cameras on phones. I could discreetly take a picture of what I liked and then  use my own imagination and that's what I did.

I ended up liking the style of the orange one on the right.


I had ribbons galore from $ Tree and other places. I also gathered other things that I thought I might use.
I measured the ribbons to 28 inches each.     The eggshells, I  dyed overnight in a vinegar, food coloring and water bath. I've used this egg shell method in another project. Then I crushed the shells fine so that I can use them as a mosaic on the foam ball.
I used a regular pair of  scissors to make a hole through the ball so that the tassel will go through.
Cross the ribbons 4 at a time in the midpoint and tack together with a stitch
Here's a close up view of the ribbons tacked together at their midpoint. NOTE: It'll be hard to push a needle through all of those layers so content yourself with sewing each layer to the one directly underneath. In the end they'll all be together when you finish.

Next I wanted to test to see if the ribbons would go through the hole.  They did. But, I noticed there's a  lot of foam dust after digging the hole and pulling the ribbon through. 


I painted the inside of the ball with Mod Podge to tamp down the foam dust for when I get ready to pull the tassel through. The outside I painted green as the background. The egg shell mosaic with be attached to the outside. Drying the ball from the inside has proven to be the most challenging. It's taking a long time.


Part 2 -Coming Soon


Tuesday, May 1, 2018

Alabama Firecrackers (8 photos)


There was food galore as we tailgated at the Georgia Steeplechase. One of the newest in our Red Hat chapter, must own a magic cooking spoon. 
She prepared much of the food and it was ooooh soooo delicious. Her Alabama Firecrackers were a big hit. They had a tart, sweet and just  the right amount of heat flavor. I'd never had them before and asked for the recipe which she freely gave.

I tried out the recipe about 10 days later.

The recipe. I wrote it in the same Steno pad my mama wrote her recipes in. Do they even make Steno pads these days?


Gather the ingredients


Mix the ingredients in the bag  by "smooshing" them.

Add the saltines to the mixture . Zip the bag and gently flip it back and forth a few times so that the mixture can coat the crackers. Allow the bag to sit for an hour. Go back and turn the bag on the opposite end for an hour. I did this one hour flipping 4 times. Finally, I allowed the crackers sit overnight.

I couldn't wait to try them the next day.
HOT!!!!!!!
They looked just fine, but too hot for me. Soooooo...
                        I started over 5 days later after reluctantly throwing the first batch away.
Take 2.
I did the same as above in a reduced amount for two sleeves of crackers, AND, when I got to the pepper flakes I used 1/4 of what the recipe called for. This time they weren't too hot for me. 

I even shared with friends who said they liked them. I plan to make them again. 

There's the magic spoon
and  there's the 


tragic spoon.


END***

Thursday, December 17, 2015

Butternut Squash and Spinach Lasagna


Ingredients
·         2 (12-ounce) packages frozen butternut or winter squash puree (about 3 cups), thawed
·         2 cups (490 grams) part-skim ricotta cheese cottage cheese
·         3/4 cup (185 grams) reduced-fat 2% milk
·         1 tablespoon fresh sage, chopped
·         1/2 teaspoon salt
·         1/4 teaspoon freshly ground pepper
·         1 (10-ounce or 285-gram) package frozen chopped spinach, thawed and squeezed dry
·         1 1/2 cups (170 grams) shredded reduced-fat mozzarella cheese Monterrey jack
·         1/2 cup (55 grams) freshly grated Parmesan cheese
·         9 no-boil lasagna noodles
Directions
Preheat oven to 400°F. Lightly spray a 13- x 9-inch baking dish with cooking spray.
·         Combine squash, 1 cup cottage cheese, milk, sage, 1/2 teaspoon salt, and pepper in a medium bowl.
·         Combine spinach, remaining 1 cup cottage cheese 1 cup (4 ounces) shredded Monterrey jack, and 1/4 cup (1 ounce) grated Parmesan cheese in another medium bowl.
·         Spread 1 1/2 cups squash mixture in bottom of baking dish. Arrange 3 noodles over sauce (noodles will appear small but will increase in size as they cook and absorb liquid). Top with 1 cup spinach mixture. Repeat 2 more times with 1 1/4 cups squash mixture, 3 noodles, and 1 cup spinach mixture. Sprinkle with remaining 1/2 cup Monterrey jack and 1/4 cup Parmesan cheeses.

·         Cover loosely with foil and bake 30 minutes. Uncover and bake 15 minutes or until lasagna is bubbly and cheese browns. Let cool  5 minutes. Cut into 8 portions.


It was DELICIOUS. I will make this recipe again but with a little more salt and pepper.
Here is the nutritional value just in case you're interested.
Nutrition Information
Serves: 8 |  Serving Size: 1 slice (4.5 inch-by-3.25 inch or 228 grams)
Per serving: Calories: 309; Total Fat: 11g; Saturated Fat: 7g; Monounsaturated Fat: 2g; Cholesterol: 38mg; Sodium: 513mg; Carbohydrate: 33g; Dietary Fiber: 5g; Sugar: 4g; Protein: 20g
Nutrition Bonus: Potassium: 489mg; Iron: 11%; Vitamin A: 221%; Vitamin C: 21%; Calcium: 47%

END