Showing posts with label basil. Show all posts

Wednesday, February 22, 2023

Roasted Cauliflower ,Stems and Greens


We all know that grocery prices have skyrocketed. This small head of cauliflower was $2.69 at ALDI.
 

After removing the core, leaves and stems  and saving them, I broke the cauliflower into florets trying to keep them about the same size.  

I tossed the florets in olive oil seasoning with Mrs. Dash, paprika, basil and  garlic powder. Regular salt and pepper will do the trick but, I'm trying to cut back on my sodium intake.

Placing the florets on a heat proof mat sprayed with cooking spray, I placed them in the oven on 400 degrees for about 20-25 minutes. I checked periodically to make sure they weren't burned.
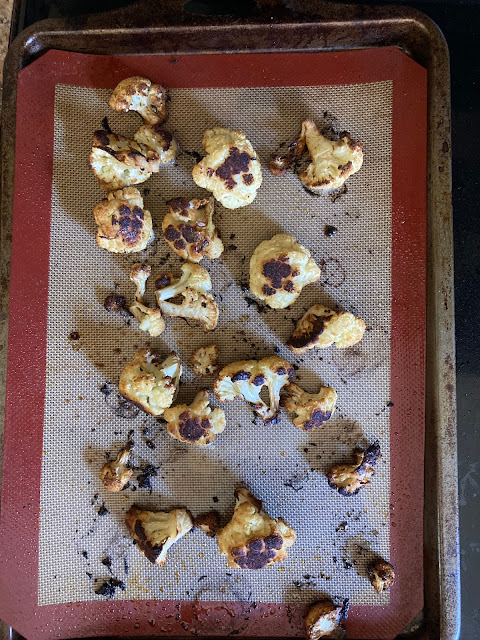
I removed them from the oven, waited for them to cool off enough to eat and dug in. OOOO-delicious. As you can see there weren't many. That browning on the tips is not burning. It adds so much flavor.  I dipped 3 of them  in a tiny bit of Ranch Dressing just to see how it would taste. OOOO-delicious again. 

Next time I'll break them into smaller florets. That way they'll cook faster with even deeper flavor. It'll also appear as if I have more than I do. 😀

But, wait. There's more!
I wanted to know if the leaves and stems were edible. I Googled "cauliflower leaves and stems".

Yes, they are. After all I did pay for the w-h-o-l-e thing and I want to get my $2.69 worth.  I found numerous recipes online. They can be used in soups, stir fried, stocks, salads and even made into cole slaw.

That's what I did with the first cauliflower. The stems can be a little tough but if you peel them the inside is perfect. BUT!, I didn't peel them. After washing the greens and stems thoroughly, I finely chopped everything so that it would be more digestible.

 I put these fixings in a bowl, added mayo,  sweet pickle relish, a little cheese for color along with seasonings of choice and began my consumption.  It was good enough for me to want to make coleslaw with it again. Some of the recipes showed additional ingredients but I preferred to keep it simple. 

I stir fried the next batch along with white onion and seasonings. I added cooked chicken and a little sweet and sour sauce.  It was tasty. 

I didn't add a lot of "stuff" to my recipes since it was my first time trying it out. I didn't want to be disappointed if it didn't turn out to my liking and I would have wasted the additional ingredients for nothing.


That's it ***


Wednesday, March 4, 2020

Low Carb Cauliflower Pizza Crust


Low Carb Cauliflower Pizza Crust (copied from the -lowcarb-diet.com)

Ingredients

  • 1 large head cauliflower
  • 1 egg
  • 1 cup shredded cheese
  • 2 teaspoons oregano
  • 2 teaspoons basil
  • 3 oz. tomato sauce I used Hunt’s Tomato Sauce

Special Equipment


Instructions

  1. Preheat oven to 450 and line a pizza pan with parchment paper.
  2. In large bowl, rice (grate) the head of cauliflower with a grater or food processor.
  3. Microwave riced cauliflower for 5 minutes and let cool for at least 5 minutes.
  4. Once cooled, wrap cauliflower in a thin kitchen towel and wring moisture from cauliflower.
  5. Mix egg, ½ cup of cheese, 2 teaspoons of oregano and 2 teaspoons of dried basil with riced cauliflower.
  6. Pat cauliflower mix on lined pizza pan and place into oven for 25 minutes.
  7. Spoon tomato sauce, sprinkle ½ cup cheese, and add desired toppings. Place back into oven and cook for 5-8 minutes or until toppings have melted.

Recipe Notes

Serving size: 1 Slice (Entire pizza cut into 8 slices)
Protein 5.34g, Carbs 3.45g, Fiber 1.43g -- NET CARBS: 2.02g
                                            xxxxx
The recipe didn't say what type of cheese to use. My Italian friends have taught me to
use only Mozzarella cheese. Orange cheese is a No, no!👆


Mix in the seasonings and other ingredients.


FAILED. Not what I expected. Obviously.


Though I followed the directions, here's what I'd do differently next time.
1. Add a little salt to the cauliflower mixture.
2. I wouldn't spread the mixture as thin as I did.
3. Reduce the cooking time and/or watch the crust as it cooks.

Though this is a FAIL, I'll be trying it again in the future.
That's it***

next time: Keto Ice Cream


Friday, October 19, 2018

I went on a Cooking Spree (11 photos)


Basil from the garden: Before and after.


Presto!- Pesto


What do you do when you buy a bag of SOUR grapes?

Rinse the grapes
 You make Grape Salad.
Halve the grapes so that they can absorb the sweetness you'll be adding.

The brown sugar and pecans really dress it up.
 Find a recipe online
The results. Deee-licious

 Miniature eggplant grown in a pot +  one from the farmer's market.


I chose not to peel mine. Rinse and slice about 1/4 of an inch.


Find a recipe for Eggplant Parmesan.

My recipe came from an old cookbook I was given over 35 years ago. But, you can always  go online or ask Alexa.
Here is the Eggplant Parmesan before I put it in the oven.
After pulling it out of the oven. It was delicious.

Squash Casserole
I had so much squash and really got tired of it. But, I would make the casserole, portion it out and freeze it. I used a recipe that my Mom got from one of her friends who was an excellent cook.

*THAT'S  ALL


Wednesday, July 1, 2009

Pot

I’ve read quite a bit about how to dry hydrangeas. About 10 years ago I did this by tying the stems together and hanging them upside down in my basement. I kept those dried flowers for 4 years until I just plain got tired of looking at them. They really hold up well. I have actually seen people at outdoor markets selling dried hydrangeas for a very hefty price.
A couple weeks ago I was fortunate to have a bouquet of big leaf hydrangeas given to me. I wanted to preserve them as long as possible so this time I stood them upright inside a tomato cage I wasn’t using inside the garage. I think they turned out pretty good. BTW I don’t know what the smaller flowers are but they seem to have done well also.


I have to warn you they're very fragile once they're dry. Have some idea as to how you plan to arrange them before putting them in a vase or pot. Otherwise, you're likely to lose a lot of blossoms.


Basil
This is Genovese Basil growing in a pot. It makes great pesto. I found a recipe at All Recipes.com
I make sure I keep it watered with the days here in the upper 90's. It grows very fast. When cutting make sure you leave a cluster of four leaves so that it will continue to grow.
Here's the recipe . Although I plan to tweak it by using chopped peanuts instead of almonds. (Remember I'm thrifty)

INGREDIENTS For PESTO
*1/4 cup almonds (substitute chopped peanuts)
*3 cloves garlic
*1 1/2 cups fresh basil leaves
*1/2 cup olive oil
*1 pinch ground nutmeg
*salt and pepper to taste

DIRECTIONS
1. Preheat oven to 450 degrees F (230 degrees C). Place almonds on a cookie sheet, and bake for 10 minutes, or until lightly toasted. (Omit this step. The peanuts are already roasted)
2. In a food processor, combine toasted almonds, garlic, basil, olive oil, nutmeg, salt and pepper. Process until a coarse paste is formed.
Note: Pick basil the same day you plan to make pesto. I made the mistake of placing the picked leaves in the fridge. NOT a good idea. It wilted away and spoiled.

Put this concoction on toasted garlic bread or pasta and a sprinkle of Parmesan cheese and you've got a tasty
treat.

Roma Tomato
The Roma tomato is pear shaped and comes in red and yellow. I chose red . I have planted yellow in the past but to me they weren't as sweet as the red. There was too much tartness. The Roma is also known as the “plum tomato” . The white you see is where I tied it to the stake in the pot.


ROSEMARY
Just for good measure I wanted to show you my rosemary plant also in a pot. The picture shows it looking a little dry but I promise I watered it right after I took the picture. This baby was saved from last year. I brought it inside and nursed it the same as a houseplant. Summer has returned and it's still alive. Some people use this plant as a hedge. Can you imagine the aroma as the wind blows? Delicious.

I've grown a little of everything in a pot in the past. I plan to experiment even more in the future.
Lastly, to show that I'm into recycling, I put the watering jug underneath the air conditioning drain and use the water for my plants. It would only drip on the ground if I didn't.


THAT'S ALL***