Showing posts with label onions. Show all posts

Thursday, February 17, 2022

Cabbage Casserole


 I wanted another way to prepare cabbage. That's when I came across Cabbage Casserole. I watched several videos on Cabbage Casserole. After watching the one by Brenda Gant  I chose her method.  Brenda Gant is a  folksy woman. You'd think you were there in her kitchen  drinking a glass of sweet tea as she prepares the dish and tells interesting stories along with her cooking.  

This dish goes by other names and variations. Cabbage pie,  Cabbage and beef casserole, Cheesy Cabbage Casserole with Sausage. Some include tomatoes, mushrooms and other add-ons.  I wanted the simple one.

These are the ingredients.


Roughly chop the cabbage and place in a greased casserole dish.

Mix, mayonnaise, cream of chicken soup and butter
in a bowl and set it to the side.

In another bowl mix the cheese, crumbled crackers and melted butter.  This will be your topping.

Spread the chicken soup, mayo, butter mixture all over the
top of the cabbage.


Sprinkle the cheese, butter, cracker crumb topping on top of the creamy topping. Place in the oven on 350 degrees for about 45 minutes or until the casserole is bubbling and the topping is golden brown.


This casserole was delicious but, here and there it was a bit salty. I discovered that the most saltiness was in the crust.  I will make it again but, only after changing  the above mentioned things I noted in the recipe. 

That's it.***


Friday, January 14, 2022

Akara-West African Bean Fritter


copied from   curiouscuisiniere
I was watching  The Joyful Cook on Facebook and she had a recipe that I thought would be easy, delicious and nutritious. It was for a dish known as akara, also known by other names in other regions of Africa and Brazil.  For the sake of simplicity let's just call it akara. I'd been saving the recipe since December 2, 2021. In her recipe she uses the term beans but, she uses black-eyed peas.  In other recipes which I consulted there are other legumes that can also be used.  I consulted three other sites,  Curious Cuisinere, The Kitchn,  and Ify's Kitchen.

copied from     Ify's Kitchen

The Joyful Cook's recipe is below.

Akara RecipeπŸ‘‡πŸ½ 
Beans 3 Cups
1 large onion
Fresh pepper to taste
Salt to taste( be Carey with the salt. 1 used 3 small teaspoons)
Oil for deep frying

I allowed an entire bag (12 oz.) of black-eyed peas to soak overnight in the refrigerator.  I followed various cook's suggestions as to the easiest way to remove the skins. I drained them and put one cup of peas into the blender with two cups of water. I pulsed 3 times and some of the skin came off.

The next step was to drain the peas separating the skin from the pea.   According to the various authors, the husks would float to the top because they are lighter than the meat of the peas. BTW- I did this several times and it is time consuming. See the video below to see how that turned out.


After numerous tries you see the beans on the left and the skins/husks on the right. 
copied from   love is in my tummy
 
Definitely not the white product the cooks I saw had.
I decided to continue on since one cook said it was okay to have a few flecks. I had more than a few.  The next step was to  whip the beans into an airy consistency similar to whipped cream. The airiness is what makes them puff up and float to the top when frying. Use a mixer with a whip attachment for this or do it by hand.(no)  Just before this I chopped my vegetable seasonings and put them aside.
I whipped and I whipped . That is to say; The whipping tool on the mixer did but, I was never able to achieve a light airy batter.  One  cook said that if there was too much water they wouldn't have the fluffy texture they're supposed to. SOOOOOOOOO, I took the batter and poured it into a clean cheese cloth and I wrung it as tight as I could. 
Look at all the water that came out.
I tried again but still no fluffiness.
Looks like cooked oatmeal
Finally, I gave up and tried frying it the way it was. Here is the result.

Fried up pretty, didn't puff up, Texture not as hoped for, tastes bland even with the seasonings. Not good.  This had been labor intensive and time consuming. The rest of the mixture went into the trash.
 
Things don't always turn out the way we want. No problem. The good thing is that I tried and got it out of my system. 

That's itπŸ‘€πŸ‘€


Thursday, July 2, 2020

Vegetarian Matzo Lasagna


I like lasagna or pretty much anything containing pasta. I also like most vegetables.
I still had matzo crackers left over from when I made Matzo Crack aka Matzo Toffee.
I searched for recipes that would allow me to use the remainder of the matzo crackers. I'm not a vegetarian but I will consume vegetarian dishes just the same as I do dishes containing meat. I try to be fair.😊 The recipe below is from Abbey's Kitchen.


Vegetarian Matzo Lasagna

Ingredients

  • 1 tbsp olive oil
  • 3 cloves garlic minced- (I used garlic powder)
  • 1 small onion diced
  • 8 oz cremini mushrooms sliced-(I used regular canned mushrooms)
  • 2 zucchinis halved and sliced into 1/2 moons (I used yellow squash)
  • 3 1/2 cups low sugar low salt marinara sauce
  • 15 oz tub part skim ricotta cheese
  • 300 grams frozen spinach thawed and squeezed to remove excess moisture
  • 1 egg beaten
  • 1/2 tsp pepper
  • 1/4 tsp salt
  • 4 matzo crackers whole wheat or gluten free
  • 1 1/2 cups mozzarella cheese grated
  • 1/2 cup parmesan cheese grated
  • Basil for garnish

Instructions

  • Preheat oven to 350 F. Lightly grease a deep 9" square baking dish.
  • Heat the oil in a large skillet over medium heat and add in the onion. Saute until it starts to soften, then add in the mushrooms and zucchini. Cook for an additional 4 minutes, then add the garlic for another 30 seconds. Set aside.
  • In a bowl, mix together the ricotta, spinach, egg, pepper and salt.
  • Layer 1: Add about 1/2 cup of the sauce to the bottom of the greased dish. Add 1 matzo cracker, then about 1/3 of the ricotta mixture, 1/3 of the veggies, about a cup of the sauce, and 1/4 of the cheese.
  • Layer 2: Repeat with matzo, ricotta, veggies, sauce, cheese.
  • Layer 3: Repeat with matzo, ricotta, veggies, sauce, cheese.
  • Layer 4: Finish with the remaining matzo, sauce and cheese.
  • Cover in foil that has been greased to prevent the cheese from sticking, then bake for about 40 minutes. Remove the foil and increase the heat to broil. Broil for 5 minutes or until bubbly and golden. Allow to sit before cutting into squares and topping with basil, if desired.
Yes, it's labor intensive.

These are the ingredients. Most I prepped the night before so that saved some time.


Cooking the squash, onions, and mushrooms
Preparing the ricotta, egg and spinach mixture.


I'd forgotten that I'd thrown away my square pan (it was old and rusty) so I used a deep 
1. cast iron skillet. 
2. sauce at the bottom
3. matzo crackers. I had to break them to fit.  NOTE TO SELF: Buy  
     another square pan.✌️ 
4. spinach mixture
5. vegetables
6. cheese
                                                        Repeat
All of the layers are done.
5. Oiling the foil so that the cheese won't stick
6. Covering the lasagna
7. Lasagna in the oven
8. Timer set for cooking or else I'll forget
DONE! That's a lot of lasagna!

That's it***


Wednesday, March 25, 2020

I Tried This

I've had some time on my hands and so decided to try out a few new things.

PLANT NOODLES
BUT WAIT, THERE'S MORE!
So far I haven't tried either of these with meatballs and tomato sauce with mozzarella cheese. But it's coming.

MAKING IT EASY

BUTTER ME UP

I had a choice of two butters.


The differences are very slight. The plant butter melted fine on my baked potato and tasted just as delicious as the regular butter.

Coffee Break
CRAFT sort of


Welcoming Spring and it's holidays can be a little difficult when you can't get out to get the craft materials you need and they aren't in your stash.
I'd gotten this plaque from $ Tree before the PandemicCrafting makes me feel better. 
Left - the plaque as I bought it from $ Tree
Right- outlined the eggs with markers. Painted the rabbit, added features and a cowboy hat. Painted the burlap tie yellow and added glitter. Highlighted the greenery. Added a pink jeweled nose. Highlighted the wording, "Happy Easter."
I wanted to add more  because it still looks too plain but this craft fix will have to do for now.

Keeping me company while blogging were these two albums.
That's it***


Friday, September 23, 2011

Cauliflower Crust Pizza

 Many people try to limit the number of carbs (carbohydrates) that they have in their meals.The only problem is that you then limit all of the comfort foods such as mashed potatoes, macaroni and cheese, pastas, potatoes, rice. More than once I've seen recipes for cauliflower mashed potatoes and cauliflower rice. Not until recently did I see a recipe for cauliflower pizza. Several reviewers stated how delicious it was and how they didn't feel guilty eating it. Being that I had cauliflower I'd gotten out of the quick sale bin at the market, I decided to try it.


I got the recipe from Piehole another blogger who apparently enjoys pies of all types and cooking.  Pizza is in the category of  pies.  Dean Martin  and others have sung about it.
 "When the moon hits your eye like a big pizza pie, that's amore."
Here's the recipe
Cauliflower Pizza Crust


*2C riced cauliflower

*1t garlic salt

*1/2t italian seasoning

*1 egg white

*1/2C reduced fat mozzarella cheese

*toppings of your choice, also remember if you add more cheese on top to count it! (Yeh, right)

Directions:

1.Preheat oven to 425.

2. Cut cauliflower into small chunks and pulse in food processor until rice like consistency is met. It should look almost identical to rice.

3.Place in microwave safe bowl (after ricing) with plastic wrap on top and microwave for 1-2 minutes.

4. Mix cauliflower with remaining ingredients.

5. Spray a baking sheet with non-stick spray and form mixture into desired shape (spray it WELL, it has a tendency to stick).

6. Make sure its not too thin, somewhere around 1/4 an inch thick.

7. Bake for 15 minutes until slightly browned.

8. Remove and add your sauce and toppings.

9. Bake for another 5-10 minutes to melt cheese and cook toppings. You can also broil it at this stage if the edges of the pizza are looking too dark.

Cauliflower has a strong smell after being cooked so you may want to employ the crew below.

Odor reducers


As you can see I've placed the cauliflower in my food processor and reduced it a little at a time into the consistency of rice. Actually it looks more like coconut to me.
I ended up with far more than two cups of cauliflower.  It's in a microwave safe bowl. I placed it in the microwave with its matching top for 4 minutes instead of the 2 as suggested by the recipe since I had more than two cups.

 
While the cauliflower was in the microwave I placed a sheet of foil on a baking sheet then sprayed the foil well with cooking spray. The directions stated that it has a tendency to stick.

After removing the cauliflower from the microwave I measured out two cups, placed it in a mixing bowl along with garlic powder (I didn't have garlic salt) ,Italian seasoning, egg white and mozzarella cheese. I used the amounts listed in the recipe above.
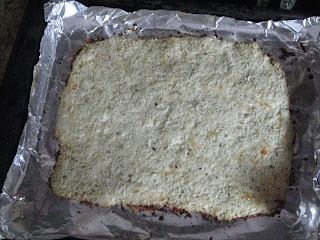
I did most of the mixing with gloved hands.  I have shaped the "dough" into a crude square on the baking sheet


 This is the "dough" after being baked for 15 minutes in a preheated 425 degree oven. It did brown a little around the edges.
I'd been to ALDI on yesterday and picked up a package of yellow, red and green peppers. The yellow and red are so sweet. My toppings included about 1/2 cup of each of these peppers, 1 slice turkey bacon, 1 1/2 oz of turkey sausage,  and onions. I cooked everything a little  since all ingredients probably won't cook at the same rate when I place them on the pizza dough.
what beautiful color


After placing the sauteed toppings on the crust, I put jarred spagetti sauce on top and then put it back in the oven for about 10 minutes.

plated cauliflower pizza
There are probably a couple of things you're thinking .
a. I should have put the sauce on first and then the toppings.  
b. I should have used real pizza sauce.

It wouldn't have made much difference because the "dough" was not very solid. Sure it tasted fine but I tested a piece before adding the toppings and it wasn't firm even after I ran it back into the oven to cook a little longer. Therefore I put the toppings first and then the sauce so it wouldn't disintegrate completely when I got ready to serve it.
Since I still have cauliflower left over, I'll try it again.  At this point I'd have to say I wasn't bowled over by this recipe. Then again I'm not a chef.
THAT'S IT***