Showing posts with label glue. Show all posts

Saturday, August 16, 2025

This and That with discards

 Sometimes you just want to do something to occupy your hands and your mind. Escapism.


The finished product.


empty vinegar jug, yellow pages,  cardboard, permanent markers, napkins, Mod Podge, air dry clay,  sealant


I didn't give any of these a lot of thought. Just played it by ear using left over and recycled items.

That's It ***


Wednesday, October 11, 2023

Thursday, April 23, 2020

Planters from recycled containers

From previous posts you know I like to recycle and upcycle.

The plan was to present this in Power Point but that didn't work out after hours of work. So just read the slides.


THAT'S IT***


Sunday, February 21, 2016

Thank You Card Earrings

I've just made my first pair of earrings. At one time I was only doing necklaces but then I decided to branch out now that I'm on a FACEBOOK fast until March 24th.

It started with me getting a thank you card that I really had not expected. It was beautiful and the sentiments expressed were the same.

1. I had balsa wood ovals in 3 sizes. After tracing around the paper, I cut them out and put them to the side.
2. I painted the largest ovals on both sides with the pea green acrylic paint you see in the picture. Since the medium and small ovals would only be seen on one side, I only painted one side.
3. After the paint dried, I glued the paper on top of the painted wood.
While I was at it, I took a map pin and pressed holes in the tops of the larger ovals prepping them for earring backs later.
I wanted a rough edging of metallic gold around the edges. I mixed the paint with glue to insure that the paper would stay down.
After the glue dried, I gave them 2 coats of  decoupage clear coating on the front and back.
 I have to admit that I used a gold nail polish on top of the green acrylic paint and then a gold metallic acrylic paint on top of that. I didn't know how it would turn out but I like the texture when it was dry.
 I had a few rhinestones left over from another project and used those to give it a little more bling.
I'm pleased with the way they turned out. I may make a pendant for a necklace.
BUT WAIT, THAT'S NOT ALL !
I just couldn't leave well enough alone.
Seeing the purplish water color stain, I ventured into making a cylindrical pair of earrings out of the paper.
It began with painting one of my business cards with purple metallic polish on both sides. I wanted a two tone look. You can see where I've cut the purple and green paper from the thank you card.

I  glued the card stock over the painted purple card sandwich style and let it dry. Then I cut it into two slender pieces just as you see in the picture.
I wanted beads at the stop of the earring and something  dangling at the bottom.
I went overboard and this is what I got.
 It was resting on my shoulders in a bent formation. It was more than I wanted to wear. I had to decide what I'd do. 
In the end I kept the top purple part and fit it with earring backs.


The pear and leaf dangles, I put back in my stash to use for future projects.

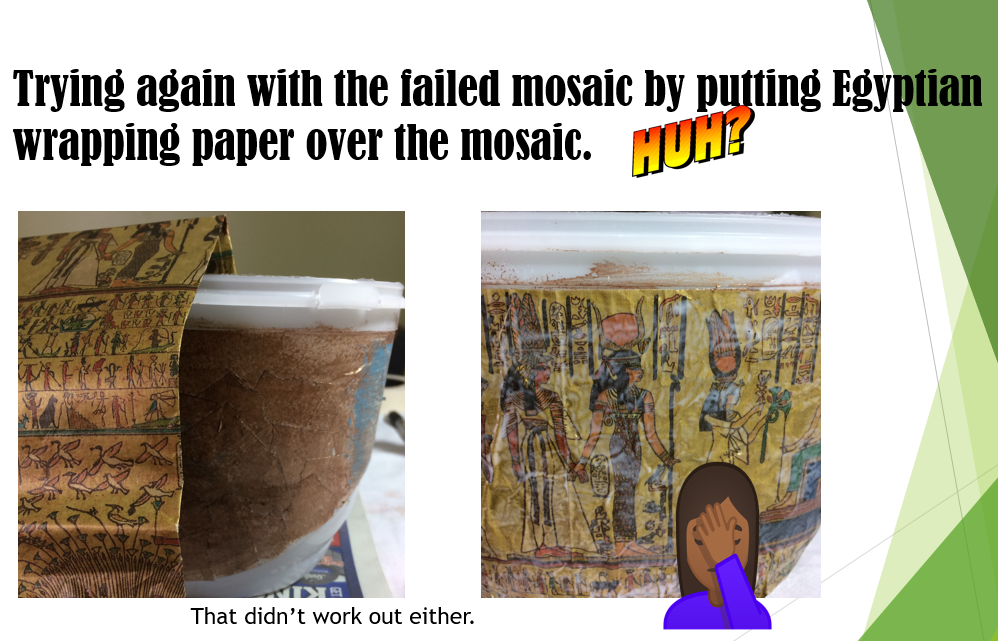
 WHAT HAPPENED TO THE PAPER ?
I'd spent a lot of  time on the paper, painting, measuring, cutting, top coating.  It was hard letting go and I couldn't think of anything else I could use it for. After much hesitation, it ended up in the trash.  Sometimes you just have to let go and learn from your mistakes.
THAT'S IT***

Monday, November 7, 2011

"Good Scents" sachets

Maybe there are some things that shouldn't be recycled but dryer sheets? They're clean to me. I came across this craft in The Big Green book of recycled crafts.


 It was titled Good Scents. Below is my craft experience.
Click on the photos to enlarge them


 I tweak my crafts to fit my materials and circumstances. If I have something that will do, why go out and buy extra stuff?  What's the point of recycling if you're just gonna buy more stuff?
  I had an old greeting card that I used as cardstock, potpourri from the Dollar Store and used dryer sheets from my own laundry room.
I ironed the dryer dryer sheets as instructed .

 I cut the cardstock/greeting card so that it would fit as a flap over the opening of the sachet. The problem here was that once it's folded over , one side will have the picture upside down. If you don't want that problem, use cardstock with a pattern that can go either way or a plain piece of cardstock.(Although, I think plain is kind of blah :(


I used OK To Wash-It glue, though I don't plan to wash it. This just happens to be the glue I had that came out in a line without me fighting with it. I like Tacky Glue but it has to be prepped and primed like a 1950's Chevy before it'll come out of the bottle. I folded the sheet on itself crimping the sides to make a pocket.


After the sides had dried I took some of the potpourri and filled the pocket half way. Don't fill it to the top or else you won't be able to close it.


The directions were to glue the cardstock to the sachet ,fold it over the top and glue the back.
Did I do that?

NOT!

Instead, I stapled the top closed, folding it over a bit so that the card stock would fit and then I stapled it again.  Below you see my finished results. One for hanging and one to go into a drawer.
I placed this one inside my buffet drawer where I keep my cloth napkins and letter opener. I'll check it out tomorrow to see if it gives the drawer a pleasant fragrance.

I used a piece of knit T-shirt string that I'd been using for another craft to hang the other sachet in my closet with my winter clothes.
NOTE:
1. I would do a neater job  ( no stapling) if I were giving this as a gift and I wouldn't use dryer sheets unless the person I was making it for was heavy into recycling, carbon footprinting and being green. I'd probably use a  sheer fabric of some sort ie. organdy, tulle.
2. I would caution against allowing the potpourri  sachet to rest against clothing or any other item you don't want to become discolored.  Sometimes the oils that are used in potpourri can harm fabrics.
3. Many potpourris can be revived after time with a few drops of essential oil of the original fragrance.
    * Purchased cedar chips or blocks would work in the sachet bags also. To revive a cedar chest or block of cedar, sand it lightly. (I learned that from The Furniture Guys back when I had cable TV)

The Big Green Book of Recycled  Crafts has numerous projects I plan to try.  The projects cater more to adults than children which I like. They are simple and useful. I'm into useful crafts not cutesy stuff.
That's It***