Showing posts with label cardboard. Show all posts

Saturday, August 16, 2025

This and That with discards

 Sometimes you just want to do something to occupy your hands and your mind. Escapism.


The finished product.


empty vinegar jug, yellow pages,  cardboard, permanent markers, napkins, Mod Podge, air dry clay,  sealant


I didn't give any of these a lot of thought. Just played it by ear using left over and recycled items.

That's It ***


Saturday, December 14, 2024

Mesh Christmas Tree Door Decoration

  I got the idea from Pinterest

Sisak Photo

There were several photos  done by various makers. 


Mine isn't exactly like the Pinterest models and the ornaments are placed "differently" but, who wants to be like everybody else?🙃 I'm pleased with the outcome.

That's it 🎄🎄🎄
Update  :12/18/2024 


The ornaments are a little more orderly.


Saturday, September 18, 2021

Faux Agate Bracelet


Inspiration not duping. There's a difference. Inspiration-I like what I see and would like to try something similar.  DupingIntentionally making something as close to the original as possible.


Hard to believe but, this bracelet is rock hard and none of the shells are falling off. Maybe I should add a necklace and earrings.😏
P.S.  Next time I'm trying Epsom Salts as the stones.

That's it ***


Wednesday, May 20, 2020

Door Decoration


 I enjoy decorating my front door. It makes a home look inviting.

 I went to my favorite site, Pinterest to get a little inspiration. After perusing the site for burlap baskets and flowers, my idea finally  hatched.

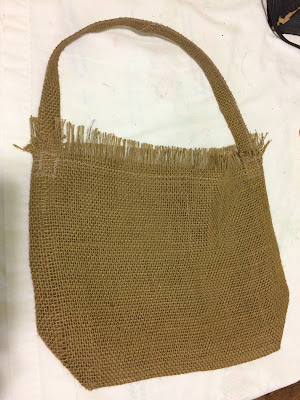
This past Sunday I took  a scrap piece of burlap I had left over from a previous project to make a burlap pouch.


I made sure I ironed it first so that I could even things up. I ran staystitching on all sides because burlap will ravel. Above the staystitching I pulled the threads giving it a fringed look.


I sewed the sides then went across the bottom and made a triangle from the side to the bottom at both side seams. 
(I think it's called a dart. Correct me if I'm wrong.)

After ironing the pouch I made a handle from from burlap too.
You can see where I fringed the top.

Placing the flowers is where a tiny challenge came in. The challenge being that I wanted to be able to use the burlap  pouch  for other things if I chose to. I used a piece of scrap cardboard, wrapped and hot glued the stems in newspaper, then glued that to the box.  I took the baby's breath apart to fill in wherever I wanted.    

The book in the upper right hand corner was my first thought
to use as the base for the flowers. Hollowing out the pages was
a chore. The book is an old Reader's Digest novel compilation
I got at the thrift store.
After gluing the flowers onto the cardboard, I folded the cardboard
 envelope style and stapled the sides.

I tucked the cardboard bunch of flowers into the burlap pouch. The cardboard wasn't stable inside so I added a bit of  hot glue on the back of the cardboard and glued it to the back of the pouch.
This is the back of the pouch. The white is where the hot glue
melded to the paper as I was allowing it to dry. That part won't be
seen.  Though glued, I'll still be able to disconnect the cardboard
if I want to reuse the pouch.
To fill out the pouch, I used crumpled newspaper.

I'm not a florist so the way I have them arranged is in no particular order.  Hanging them on the closet door was a dress rehearsal before hanging them outside. I found a purple dragonfly in my stash from another project and penned him to the outside of the pouch.
Here is the finished product. I'm pleased. For a closer look refer to the picture at the beginning of the post. (If you look even closer you'll see a reflection of me snapping the picture.) 😀

That's it***

Sunday, July 30, 2017

Fabric Covered Boxes

      At one time storing your record albums, LPs, vinyl, (or whatever YOU want to call them) in a milk crate was the thing. I've had these since I don't know when. There's also another box underneath the ones you see here on a lower shelf.

      I had the living room painted and spruced up, so I decided to replace the crates with decorative boxes similar to the ones I've seen in home and craft stores. I first consulted YouTube to get some ideas on how to cover the boxes. In the end, I did my own thing.
I happened to be at Moe's Southwest Grill  and saw one of the workers about to throw away what looked like sturdy,clean, tomato boxes. I asked if I could have them and he said yes. BTW- These boxes also came with lids, but I didn't need those so I took them to the recycling bin. After wiping the boxes down in a bleach solution, drying in the sun, then spraying with disinfectant, I proceeded with my project of covering the boxes in fabric.
 The fabric came from Walmart. We're limited around here as to where we can buy fabric. You can see my blue glue gun in the background.


After a lot of folding, pleating and cutting I was able to hot glue the fabric to the box. It could have been neater but this was my first time trying this.


 I didn't bother to line the inside since no one is supposed to be examining this and it's just for me.


Cutting out the space for the handles wasn't too bad. I made an  "X", then folded the fabric to the inside. 
Folding the edges of some of the material to finish it off and then gluing it on allowed it to come out a lot neater.
Here I am gluing on the folded strips for a clean finish on the handles.


You can see the finished handle has no raw edges.  I did this method on both boxes.

 
The box still looked a little plain ...


so I brought out the metal lock icons I had in my stash that I'd gotten for $1 at Michael's some time ago. I didn't know what I was going to do with them at the time but, I knew they had a future in some project I'd concoct. I was able to get 2 rolls of the trim you see below with a gift card I've had since 2016, along with asking for a seniors discount. (Being a senior citizen has it's perks😀. It's only 10%).
 
No, I didn't measure before I put the trim on.

Still,the albums look a lot more dressy on the shelf. The locks didn't show up as well as I'd like and I'll probably go back and dry brush them with a little silver paint to enhance the detail.


Here's a close up of the trim and lock.I'm satisfied with how this project turned out.

That's it***

Monday, April 15, 2013

BIB NECKLACE with TEE SHIRT SCARF

Feast  your eyes on all of the broken jewelry that has been given to me. Now that it has become known that I will recycle and repurpose just about anything this is where old costume jewelry comes to get a lift. 75% of what you see is from friends giving me ziplock bags of discards. I'm grateful to them for it because I enjoy trying to figure out a way to use it.

Amid this clutter was the makings of a bib necklace.  I'd planned to do a cloth necklace with some pieces I bought when Sis and I went to the Jasper Wal-Mart.  The cloth necklace didn't turn out the way I wanted but I salvaged portions of it anyway.

back and front of bib necklace before decorating
 I cut an arc from heavy cardboard and covered it with the fabric using school glue. After it was dry I put several coats of decoupage sealant on the front and back allowing each to dry thoroughly.  I took my cordless drill and placed two holes on both sides.


Be careful not to cover the holes
On the other side I hot glued trinkets from broken earrings, necklaces and etc. In the center is a fabric flower I made from some of the fabric. It looked too plain so a glued in a center.


Again, be careful not to get glue in the holes
 As added protection for the seed beads I placed a thick layer of sealant over the areas I felt were a little fragile.


If your camera says 'change the batteries', do it or else you get dusty looking pictures

Using jump rings and chain I looped the chain through each of the holes and then attached them to larger jump rings.


Things got a little out of hand because I was watching Downton Abbey
and trying to keep my hands busy.
 Attach jump rings to the fabric and t shirt and medium chain. Put on a lobster clasp and you're done with the necklace.  Yes, there's a lot on there, the fabric, the tee shirt beads, etc.

BUT WAIT THERE"S MORE!


You know I couldn't stop with just the necklace. It had to have a matching tee shirt scarf. You can  wear either the scarf or the  necklace or BOTH.

It looks like a lot but it's been doubled.
Feeling adventurous? Strut it then.
THAT'S IT***

Monday, December 31, 2012

2013 A NEW CHAPTER

I’ve seen a number of book page wreaths all over the net. Just one of the ways to use an old book.

I still had my tablescape props and so I decided to use the 2013 book as the focal point to my door decoration. I gathered the items I needed.

Since I wasn’t making a wreath (by now you know I use what I have on hand) I went to my tried and true base product, CARDBOARD. I strengthened the cardboard foundation by taping then hot gluing two pieces of cardboard together.
TIP: Hot Gluing large flat areas
If you know like I know, hot glue dries fast and when you're trying to cover a large area that can be tedious. So what I did was to spread the hot glue over the area, sandwich it together and then reheat the glue by placing a press cloth over the cardboard ironing over the cardboard back and front and letting it cool .


The pages started out rolled and long.
 Rolling and stapling the paper tubes was the most time consuming part. The first set of tubes I rolled lengthwise and the second set width wise


Since I was working in an off center way my tubes went a little array.


Since I'm a lazy crafter I folded and flattened the tubes so
that they would fill in more space.


Here you can see the acrylic and glitter paints along
 with the alcohol and spray bottle
 After gluing everything on I wanted more color so I took a small amount of turquoise acrylic paint and put it in a spray bottle along with some rubbing alcohol and sprayed the rolled book pages. (So much for alcohol ink)


I wanted more shine so I dabbed turquoise and blue glitter paint here and there with my fingers.


After it all dried I hot glued the book in the center such as it was.

TIP: Hot Glue Tip #2   Got this tip fromYou Tube

I placed the glue on the back of one side of the book. I knew it would harden  before I could finish the areas that needed gluing so to reheat the glue, I held  a blow dryer(low heat) about two inches above the glue waving it back and forth until I felt the glue was heated sufficiently and evenly. I quickly pressed one side of the book in place. I did the same for the other side.

There were gaps between the hardback book and the glued on pages so I took a piece of fabric I’d bought at a thrift store and knotted it in various places and glued it around the book to fill in the gaps.


I had bronze colored glass beads that I felt would add to the “glamour” so I placed those around the margins of the open book.

To hang the piece I used the rest of the left over fabric  to make an adequate loop. I sewed and glued the fabric loop to the cardboard and tubes. It is now hanging on my front door. 

It’s not perfect and it has flaws but so do I and I’m still functional.
That's It *** 

Wednesday, December 26, 2012

DIY Necklaces or Copycat 3


:? Once again I can't remember where I found this image. I often copy and
 paste pics on an inspiration page w/o copying the url.
 THE EYES HAVE IT
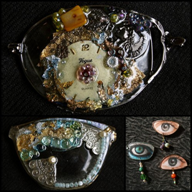
The inspiration for the necklace below came from these brooches made from eyeglass lenses. As usual I used what I had on hand.
closeup of necklace
The lens is from a cheap pair of dollar store reading glasses. I have several pair . As they break, I save them for crafts. I painted it green with a Sharpie marker. The glass looking baubles are actually plastic and come from the Dollar store. I bought a roll of gold chain a while back and used that for the necklace drop. It is too long so I will be cutting off a portion of it. I will still make it long enough to slip over the head.

SHELLING IT OUT

courtesy of www.anthropologie.com

I had seashells in my stash and shells that had been given to me. When I saw the anthro necklace I searched about the NET on a way to color the shells with the marbled distinction as the inspiration. I came across several nail tutorials on how to do fancy nail colors with polishes and a cup of water.
I had to practice a few times but I finally got it to my liking. I ended up doing the gold and yellow wooden bead the same way. The pink , white and black bead, I rolled through paint.  I chose pink, yellow, gold nail polish which I already had. After coloring the shells and allowing them to dry, I gave shells and beads 3 coats of finish. I dilled a small hole in the shells and threaded a thin silver cord through everything tying it in a knot at the back.
NOTE: The twirling of the shells in the polish and water is addictive. I tried using acrylic paints in the water but they only sank to the bottom. Without changing the water I put nail polish on top.

WARNING: Don't use a foam cup. The reaction of the polish with the acrylic paint caused it to eat a hole in the bottom of the cup in the exact spots where the paint had sunk to the bottom. All of a sudden you have water everywhere.  This happened twice. That's why I know it was a chemical reaction.

Closeup of shell necklace

DIY seashell and bead necklace

P O P    PINK, ORANGE, PURPLE


www.anthropologie.com


Composed of wooden cut outs, glitter paint, acrylic paint, cardboard, colored gift tissue paper, chain, self made jump rings.


DIY anthro necklace. No purple stones so I used glitter paint as a  temporary fix.

I haven't placed a clasp on this necklace. I plan to change the purple and orange areas to something more substantial.