Showing posts with label pinterest. Show all posts

Monday, January 23, 2023

Shirt Bleaching and Shirt Apron


Last year ( 3-24- 2022) I bought two "flannel' shirts from the thrift store. I was impressed with the bleached flannel shirts that were all the craze.


Mistake Number 1, it isn't flannel. The bleach caused the fabric to become weaker. The other shirt (not shown) turned out better. From my profile you know I recycle and upcycle. I'll see what I can do with it before I throw it away. Sooo, contrary to what I said above I tucked it away. 

January 21, 2023

Then I saw this;


I've needed another craft apron for some time. This will be perfect. Getting paint on it will only add to it's character. 

BTW- Finding a REAL flannel shirt is pretty difficult. They don't make them the way they used to.

That's it***

Wednesday, May 20, 2020

Door Decoration


 I enjoy decorating my front door. It makes a home look inviting.

 I went to my favorite site, Pinterest to get a little inspiration. After perusing the site for burlap baskets and flowers, my idea finally  hatched.

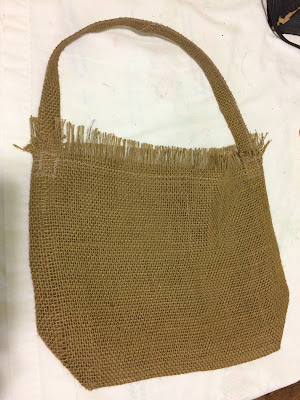
This past Sunday I took  a scrap piece of burlap I had left over from a previous project to make a burlap pouch.


I made sure I ironed it first so that I could even things up. I ran staystitching on all sides because burlap will ravel. Above the staystitching I pulled the threads giving it a fringed look.


I sewed the sides then went across the bottom and made a triangle from the side to the bottom at both side seams. 
(I think it's called a dart. Correct me if I'm wrong.)

After ironing the pouch I made a handle from from burlap too.
You can see where I fringed the top.

Placing the flowers is where a tiny challenge came in. The challenge being that I wanted to be able to use the burlap  pouch  for other things if I chose to. I used a piece of scrap cardboard, wrapped and hot glued the stems in newspaper, then glued that to the box.  I took the baby's breath apart to fill in wherever I wanted.    

The book in the upper right hand corner was my first thought
to use as the base for the flowers. Hollowing out the pages was
a chore. The book is an old Reader's Digest novel compilation
I got at the thrift store.
After gluing the flowers onto the cardboard, I folded the cardboard
 envelope style and stapled the sides.

I tucked the cardboard bunch of flowers into the burlap pouch. The cardboard wasn't stable inside so I added a bit of  hot glue on the back of the cardboard and glued it to the back of the pouch.
This is the back of the pouch. The white is where the hot glue
melded to the paper as I was allowing it to dry. That part won't be
seen.  Though glued, I'll still be able to disconnect the cardboard
if I want to reuse the pouch.
To fill out the pouch, I used crumpled newspaper.

I'm not a florist so the way I have them arranged is in no particular order.  Hanging them on the closet door was a dress rehearsal before hanging them outside. I found a purple dragonfly in my stash from another project and penned him to the outside of the pouch.
Here is the finished product. I'm pleased. For a closer look refer to the picture at the beginning of the post. (If you look even closer you'll see a reflection of me snapping the picture.) 😀

That's it***

Monday, March 26, 2018

Boho upcycle and recycle (6 photos)

bo·ho
ˈbōhō/
noun
  1. 1.
    informal term for Bohemian (sense 2 of the noun).


 lillienoradrygoods
lillienoradrygoods


I can waste a lot of time on PINTEREST.
But, the ideas are mesmerizing and get my creative juices going. The juices might have been flowing but it was two months before I got back to the project.

Wayward Threads


 The inspirational outfits

I'm not artist, but this is my sketch. I had big plans. And, yes I sketched it on the back of an envelope that came in the mail.
I have a habit of saving them and using them as scratch paper. It's just another way I recycle.

I bought these 3 items from the second hand store ON Seniors Day which afforded me another 50% off of my total purchase. I cut the tees into rectangles and cut the flannel shirt about where my waist would be.
I bought the shirt larger to allow for any cutting and seams I might need to do. Turns out the sleeves were toooo long and I had to take darts in the back. When it came to mitering the seams on the side I had to contact YouTube University😃. You can find a wealth of information there for almost any problem you have.
I wanted to add lace to the bottom similar to others I'd seen and so I went to yet another thrift store looking for a vintage lace that would fit in with the theme. I found it on pillow shams of which I cut it off and sewed to the bottom. The end result was neatly done . When I put it on, I didn't like what I saw. It needed more alterations and customizing for my figure.
I wasn't willing to spend more time or money on this project.
This will be going into a pile of discards that I'll give to a friend for her grand kids to play dress-up in.

I'm not disappointed. I probably spent about $10 on this project. I'm not defeated. On to the next boho project.

END***