Wednesday, December 26, 2012

DIY Necklaces or Copycat 3


:? Once again I can't remember where I found this image. I often copy and
 paste pics on an inspiration page w/o copying the url.
 THE EYES HAVE IT
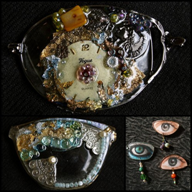
The inspiration for the necklace below came from these brooches made from eyeglass lenses. As usual I used what I had on hand.
closeup of necklace
The lens is from a cheap pair of dollar store reading glasses. I have several pair . As they break, I save them for crafts. I painted it green with a Sharpie marker. The glass looking baubles are actually plastic and come from the Dollar store. I bought a roll of gold chain a while back and used that for the necklace drop. It is too long so I will be cutting off a portion of it. I will still make it long enough to slip over the head.

SHELLING IT OUT

courtesy of www.anthropologie.com

I had seashells in my stash and shells that had been given to me. When I saw the anthro necklace I searched about the NET on a way to color the shells with the marbled distinction as the inspiration. I came across several nail tutorials on how to do fancy nail colors with polishes and a cup of water.
I had to practice a few times but I finally got it to my liking. I ended up doing the gold and yellow wooden bead the same way. The pink , white and black bead, I rolled through paint.  I chose pink, yellow, gold nail polish which I already had. After coloring the shells and allowing them to dry, I gave shells and beads 3 coats of finish. I dilled a small hole in the shells and threaded a thin silver cord through everything tying it in a knot at the back.
NOTE: The twirling of the shells in the polish and water is addictive. I tried using acrylic paints in the water but they only sank to the bottom. Without changing the water I put nail polish on top.

WARNING: Don't use a foam cup. The reaction of the polish with the acrylic paint caused it to eat a hole in the bottom of the cup in the exact spots where the paint had sunk to the bottom. All of a sudden you have water everywhere.  This happened twice. That's why I know it was a chemical reaction.

Closeup of shell necklace

DIY seashell and bead necklace

P O P    PINK, ORANGE, PURPLE


www.anthropologie.com


Composed of wooden cut outs, glitter paint, acrylic paint, cardboard, colored gift tissue paper, chain, self made jump rings.


DIY anthro necklace. No purple stones so I used glitter paint as a  temporary fix.

I haven't placed a clasp on this necklace. I plan to change the purple and orange areas to something more substantial.

Saturday, December 22, 2012

Drapery Finials From Foam Balls


Trying to glue the lace on was tedious especially avoiding getting burned by the glue.


Present finials and curtain rod. As you can see after falling the one in the middle lacks its tip.

Drapery finials are pretty expensive. The ones that came with my curtain rods were large for the area but since they weren't being moved on a regular basis it was okay. I had foam balls left over from a project and didn't want to throw them away. By now if you've read any of my previous posts you know that I am a frugal person who doesn't like to throw anything away. BUT! I hasten to say I AM NOT A HOARDER. I tried hot gluing lace onto a foam ball with the idea of  painting lace and ball with a metallic acylic paint. I wasn't pleased with the outcome. I ended up throwing those 2 balls away. See, I'm not a hoarder. 


 After painting one of the balls weith the sage green metallic paint, I noticed that the paint wasn't really grabbing. There were six balls in the package so I had enough for a do over since I only needed 4. This time I roughed up the balls a little with sandpaper. Here you have to be careful or you'll end up sanding away the whole ball or getting it uneven. I decided on a bronze mettallic paint. I painted it with two coats of the bronze but it could have stood a couple more coats.


 I used wooden cutouts, hot glue and permanent markers for the embellishments
The third ball from the right shows where I made the indentation for the curtain rod.

Before I did any painting I skewered each ball with the curtain rod so that it would fit after I finished it and also to use as a guide for gluing on the embellishments.  I removed the foam stuck inside the curtain rod with a disjointed wire hanger (the kind Joan Crawford allegedly would go bonkers about)
 
This is a photo of the finials at the end of a valance. I ended up putting a little double sided tape on the inside of each finial so there would be more grab to keep them on.

Here is a closeup of the finial.

Right now I'm satisfied with the results and that's all that matters.
THAT'S IT***

Monday, December 17, 2012

Copycat 2 or Inspiration necklace


http://www.jlkjewelry.com/
 More flattery through imitation. I saw this necklace at  JLK Jewelry. It's made from silver and semiprecious stones. Her website  describes her work in the quote below .
"Jennie Lorette Keatts creates handmade pottery cabochons, using Jugtown Pottery glazes. She then sets the stones into her own hand fabricated silver designs."


Here's my DIY
I used:

flat glass beads (Dollar Store)
Floral wire (Dollar Store)
Cardboard (free)
hot glue
white school glue
 jump rings (in my stash )
paper clip

I began with prepping the cardboard the way I explained in my previous post titled Copycat. I made a freehand drawing of a triangle with curved angles and used it as a template. After cutting out the number of triangles I needed, I painted them with Dark Patina, a metallic acrylic paint by DecoArt.  I went around the edges with a silver Sharpie pen. The pieces were sealed with a matte water based sealer.


After the pieces were completely dry, I used my drill to place the holes for the jump rings and to join the pieces together.


The inspirational necklace has  earthy  semiprecious stones.  I didn’t have those so I used flat glass beads that are often used in flower vases and other decorations. If you go to my Tablescape post you’ll see where I used them as a decorative accent.

I didn’t have any silver wire so I decided to use blue floral wire which matches the flat glass beads. I could have painted the wire after gluing it to the triangle but I would have to sand it first to rough it up so that it would accept the paint.
I have yet to figure out a cheap, free, creative way to make a bezel for the settings. In this case I used a silver Sharpie( see yellow arrow) and colored around the flat bead to give the appearance of a bevel before gluing it on.
The hooked end of the clasp I made from a paper clip (see blue arrow). I need more practice on this.   


AFTERTHOUGHTS    The metallic paint was not the color I expected. Under store lights and in the bottle it appeared to be what I wanted but it was too dark.   The glue gun gave me fits with strings going everywhere.  It would make huge globs when I didn't need it to and not enough glue when I needed it. It made the project not as neat as I would have liked it. I have since learned that cleaning the nozzle and freezing the glue sticks is supposed to help with that problem. I'll try it and see. Using the silver Sharpie to imitate a bezel didn't work.
This is me wearing the necklace.
It has more of a medieval look to me.

THAT'S IT***