Showing posts with label decoupage. Show all posts

Friday, June 5, 2026

Bracing the Bracelets

Now that I have the necklaces corralled it was time for the bracelets. 

1. I spotted a small wooden crate that  once held fancy fruit and chocolates, at a second hand store   A new crate at a Craft or $ Store would have been about $5. I got this one for 99 cents. 

2. A  base coat of white followed by pink was  the previous plan.  I later decoupaged it with a floral gift wrapping paper which you'll see in the final product.

3. The wooden drawer knobs in my stash finally got a chance to shine...literally. They were from a project that was never fulfilled. Originally,  I wanted the knobs green, but later decided on silver.

4.  The wooden dowel purchased from Lowe's for $1.69+ was cut to length with a  hacksaw I'd forgotten was in the garage. The pool noodle was easy to cut with a pair of strong scissors.

5.  I'm pleased with how this project turned out. You can see the decoupaged floral paper I used. The cup hooks are strong and hold the bracelets and dowel well.

        6. Now I can see the bracelets (this is just a sample) I have without rummaging through a drawer  looking for them. This hangs in my closet, on the wall next to the necklace holder.

That's it ***


1 


Wednesday, March 17, 2021

Wall Grouping - update

Do you  remember this?   


It's from a previous post,  Wall Grouping, that I did on 10/31/2020.
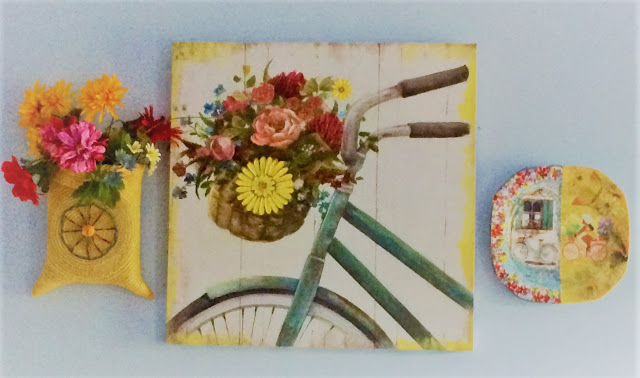
I'd had my bedroom freshly painted and wanted some type of wall decoration to accompany the picture of the bike I'd bought. I made a faux flower container from a place mat and the hybrid plate  from

 an old plate I had already.  Downloaded pictures from the NET were used to  decoupage onto the plate.

A couple of nights ago I was awakened by a loud thump in my bedroom.  For some strange reason, it didn't frighten me. I turned on the light, looked around the room but saw nothing. As I was returning from the bathroom, that's when I saw that the plate above my bed had fallen.
The Command Hook that was the correct size and weight for the plate didn't hold up. I'm glad it didn't fall on my head and instead behind the headboard. What you're seeing on the back of the plate are strips of duct tape I placed over the hanger after I'd used E-6000 to glue it on back when I made it.   

I don't plan to make another one. Honestly, I was planning to take it down anyway.  I enjoyed making it.  Purpose served. 

That's it*** 

Saturday, October 31, 2020

Wall Grouping

 It started out with the bicycle picture below hanging above my bed.

But, then I thought it needed a little bit more around it. I searched around the Net for ideas. 


Things changed as they always do when I'm crafting.


A  paper clip as a hanger 

Laid it all out on the bed to get an idea

DEcided there was not enough yellow in the original picture.
BEFORE
AFTER
Went around the edges in yellow and added a couple of  flattened, ironed, yellow, silk flowers glued on with Mod Podge.
The final grouping

I'm pleased.
That's it.


Wednesday, May 22, 2019

REMIXES - Macaroni & Cheese, Stationery Pouch

"If at first I don't succeed, I'll usually try at least once more."

Remember this? 😩

I tried it again and things worked out a lot better. This time I used a recipe and I had all of the ingredients I needed. No shortcuts this time.
Here's the Remix
I've had this recipe for a long time and have used it on more than one occasion. 


I may not be the best cook but I can follow directions.😃
***
I enjoy crafting and sometimes things don't turn out the way I expect them to. I'll  put things to the side if I feel there is a chance they might be saved later on. And so it was with this stationery pouch which was supposed to be a clutch purse.

Anthropologie
Some time back, I'd observed a tote bag on the Anthropologie site made from canvas art with leather straps. 


As with most of their items price is an object and I prefer smaller handbags to larger ones. I still thought it was a unique idea. 
I headed to a couple of thrift stores to see what I could find. I didn't search high and low because I'm not a big fan of shopping. Jupiter has to align with Mars or something like that to make me WANT to shop.
😲 But, I digress. 
Nothing on fabric canvas was I able to find. I ended up with posters and fabric scraps that I had in my stash which  I cut to clutch purse size, sewed and glued together and sealed the paper with shiny Mod Podge.  
So basically I decoupaged it.💃Whatever.
I still wasn't satisfied so I put it aside until..
EUREKA!➡️➡️➡️➡️➡️ Stationery pouch. I hot glued a piece of grosgrain ribbon to the back to use as a tie closure and I was done.

That's It ***


Wednesday, March 22, 2017

Personalized phone case

I decided on a Queen of Hearts theme since we can all use more love 💟.


4.Laser copies of cut outs made at  Staples.  5. Cutting and gluing on the pieces. Then covering with a matte finish of decoupage.
Not perfect, but good enough for me. I plan to do another with a different design.
That's it 💓💘💗

Sunday, February 21, 2016

Thank You Card Earrings

I've just made my first pair of earrings. At one time I was only doing necklaces but then I decided to branch out now that I'm on a FACEBOOK fast until March 24th.

It started with me getting a thank you card that I really had not expected. It was beautiful and the sentiments expressed were the same.

1. I had balsa wood ovals in 3 sizes. After tracing around the paper, I cut them out and put them to the side.
2. I painted the largest ovals on both sides with the pea green acrylic paint you see in the picture. Since the medium and small ovals would only be seen on one side, I only painted one side.
3. After the paint dried, I glued the paper on top of the painted wood.
While I was at it, I took a map pin and pressed holes in the tops of the larger ovals prepping them for earring backs later.
I wanted a rough edging of metallic gold around the edges. I mixed the paint with glue to insure that the paper would stay down.
After the glue dried, I gave them 2 coats of  decoupage clear coating on the front and back.
 I have to admit that I used a gold nail polish on top of the green acrylic paint and then a gold metallic acrylic paint on top of that. I didn't know how it would turn out but I like the texture when it was dry.
 I had a few rhinestones left over from another project and used those to give it a little more bling.
I'm pleased with the way they turned out. I may make a pendant for a necklace.
BUT WAIT, THAT'S NOT ALL !
I just couldn't leave well enough alone.
Seeing the purplish water color stain, I ventured into making a cylindrical pair of earrings out of the paper.
It began with painting one of my business cards with purple metallic polish on both sides. I wanted a two tone look. You can see where I've cut the purple and green paper from the thank you card.

I  glued the card stock over the painted purple card sandwich style and let it dry. Then I cut it into two slender pieces just as you see in the picture.
I wanted beads at the stop of the earring and something  dangling at the bottom.
I went overboard and this is what I got.
 It was resting on my shoulders in a bent formation. It was more than I wanted to wear. I had to decide what I'd do. 
In the end I kept the top purple part and fit it with earring backs.


The pear and leaf dangles, I put back in my stash to use for future projects.

 WHAT HAPPENED TO THE PAPER ?
I'd spent a lot of  time on the paper, painting, measuring, cutting, top coating.  It was hard letting go and I couldn't think of anything else I could use it for. After much hesitation, it ended up in the trash.  Sometimes you just have to let go and learn from your mistakes.
THAT'S IT***

Friday, March 1, 2013

Return of the Crafting Groove

My name isn’t Stella but I finally got my crafting groove back. It took an incident to send me back to the studio in order to calm and relax myself through crafting.


I’d been saving a couple of empty cardboard tape rolls to make bracelets. I got my inspiration from craftyluna at crafster.org

craftyluna

Elizabeth Abernathy How cool is this?

The one at Elizabeth Abernathy really peaked my interest.

I took out my supplies


cardboard rolls

acrylic paint

sandpaper (not shown)

Egyptian wrapping paper

Pictures from National Geographic

White Glue(not shown)

High gloss decoupage sealant

Brushes, rag
I didn't take photos as I went . I was trying to calm myself and didn't think about it.

*In order for the paper to adhere to the cardboard I sanded it inside and outside wiping the dust off with a damp rag.


*I painted one cuff inside and outside with Kelly Green and the other with a copper metallic. I gave each cuff three coats of paint allowing them to dry between coats.

*Being an eager beaver I dried them in the oven on 200 for 20 minutes between coats.

*National Geographic always has beautiful colorful photos. I randomly tore underwater scenes and glued them onto the cardboard overlapping the pictures.

*For the Egyptian bangle I used wrapping paper that I have had for over 15 years that was sitting in my stash of some-day-I’ll-do-something-with-this box.

*I put two coats of sealant inside and outside the bangles allowing them to dry. I used the oven for the first two coats but found that it was a little sticky when it came out needing a little extra time to cool down.

*After these coats dried I dry brushed (actually wiped with a rag) the bangles with acrylic Chocolate Bar paint to give it an antique/worn look.

*I repeated with three more coats of sealant about every 4 to 5 hours. The coats were pretty thick. I allowed these to air dry.


As you can see they are very shiny almost glassy looking.


They turned out great. If it looks as if some white is showing through, it isn’t, it’s just the shine.
THAT'S IT***


Friday, February 24, 2012

FAKE ART CANVAS HANDBAG
I like many of the unique items featured at the Anthropologie site. No way will I be purchasing any of their goods because:
1. It doesn't come in my size.
and
2. It's out of my budget.
Thankfully I don't have to join their site just to look. A lot of other sites are snobby that way. Their handbags are impressive. I saw  this one and admired it. It was on sale for ~$80.
 
They also have another tote style that runs close to $400.


I got to work trying to figure out how I could make something similar to the envelope clutch.


Holding the rolled print in place with cans from the pantry.
White canvas fabric  before staining.

The fabric and print were stained with  several coats of brown acrylic paint mixed with decoupage medium. I still wasn't pleased and so I added a little strongly brewed coffee to the decoupage.  The weather was pleasant and so I hung it outside on the fence to dry between coats.


I could leave it as is but I decided to put in a lining.
Before putting in the lining I  attached a pocket. I know it's shabby but I wasn't that interested in making it perfect. This is a test. All of the materials used except the art print were scraps or pieces I had in the closet that were either left over from other projects or never used and part of my stash.


These pictures are a little out of sync. This should have been above. I should have put the pocket on before
sewing the lining to the top. After attaching the pocket , I attached the lining with fusible web. It worked like a charm. 

This was the hardest part, sewing in the gusset. When it came to the curve of the purse, I was unable to position things so that I could sew it so I ended up gluing the curved area down from the inside.
The open purse
No, the stitches aren't straight and uniform but I'm still pleased with it.

Purse closed with  stained canvas flap

Not perfect but I'm pleased with it. The bead at the closure was made with scrap from the print.  I have been experimenting with paper bead making.


Velcro is used to close it.
There are flaws which I expected. Overall I succeeded in what I wanted to accomplish.

THAT'S IT ***