 |
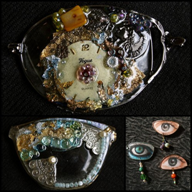
| :? Once again I can't remember where I found this image. I often copy and paste pics on an inspiration page w/o copying the url. |
The inspiration for the necklace below came from these brooches made from eyeglass lenses. As usual I used what I had on hand.
 |
| closeup of necklace |
 The lens is from a cheap pair of dollar store reading glasses. I have several pair . As they break, I save them for crafts. I painted it green with a Sharpie marker. The glass looking baubles are actually plastic and come from the Dollar store. I bought a roll of gold chain a while back and used that for the necklace drop. It is too long so I will be cutting off a portion of it. I will still make it long enough to slip over the head.
SHELLING IT OUT
 |
| courtesy of www.anthropologie.com |
I had seashells in my stash and shells that had been given to me. When I saw the anthro necklace I searched about the NET on a way to color the shells with the marbled distinction as the inspiration. I came across several nail tutorials on how to do fancy nail colors with polishes and a cup of water.
I had to practice a few times but I finally got it to my liking. I ended up doing the gold and yellow wooden bead the same way. The pink , white and black bead, I rolled through paint. I chose pink, yellow, gold nail polish which I already had. After coloring the shells and allowing them to dry, I gave shells and beads 3 coats of finish. I dilled a small hole in the shells and threaded a thin silver cord through everything tying it in a knot at the back.
I had to practice a few times but I finally got it to my liking. I ended up doing the gold and yellow wooden bead the same way. The pink , white and black bead, I rolled through paint. I chose pink, yellow, gold nail polish which I already had. After coloring the shells and allowing them to dry, I gave shells and beads 3 coats of finish. I dilled a small hole in the shells and threaded a thin silver cord through everything tying it in a knot at the back.
NOTE: The twirling of the shells in the polish and water is addictive. I tried using acrylic paints in the water but they only sank to the bottom. Without changing the water I put nail polish on top.
WARNING: Don't use a foam cup. The reaction of the polish with the acrylic paint caused it to eat a hole in the bottom of the cup in the exact spots where the paint had sunk to the bottom. All of a sudden you have water everywhere. This happened twice. That's why I know it was a chemical reaction.
 |
| Closeup of shell necklace |
 |
| DIY seashell and bead necklace |
P O P PINK, ORANGE, PURPLE
 |
| www.anthropologie.com |
Composed of wooden cut outs, glitter paint, acrylic paint, cardboard, colored gift tissue paper, chain, self made jump rings.
 |
| DIY anthro necklace. No purple stones so I used glitter paint as a temporary fix. |
I haven't placed a clasp on this necklace. I plan to change the purple and orange areas to something more substantial.


