Monday, April 29, 2013

LIME CAKE

Who could forget the ugly cake? 
I vowed to do better next time with a key lime cake. I became a fan of the key lime cake after attending a church tea and tasting one made from scratch by one of the ladies there. There are some things that can't be duplicated and I didn't even try. I just wanted some semblance of the cake and so I tried again after scouring the NET for EASY key lime cakes. Most of what I found was the 1960's version in which holes are punched in the cake with a toothpick and lime jello is poured on top allowing it to seep into the cake. That wasn't what I was looking for. BUT, I sort of ended up with it anyway. *More about that later.

I used a recipe I found at Fabulessly Frugal .  Of course being me I changed some things.
Here's the general recipe:


This isn't the entire recipe but you get the idea. You measure, mix, stir, etc. etc.


Items used for cake.
I used prepared limeade in place of the water the cake mix called for and lime jello to give it flavor and color.


It has such a pretty color.


This is the cake out of the oven cooling.


I used the sheet cake pan again. You may notice a greenish tinge to the cake.


I took this photo to show BEFORE things could go wrong. I cut a sliver of the unfrosted cake and put whipped topping to the side which I then spread over my cake.. The cake was delicious. It satisfied my desire for key lime cake .


*Experimenting  more I  tried to finagle a topping using lime jello and whipped topping.

The two ingredients


Dissolving and mixing the jello using limeade


I won't show you the results but it was a retro version of the Jello Fluff without the marshmallows.  Showing the results would have made UGLY CAKE #2. The fluff tasted just fine and eventually gelled.  I prefer to leave well enough alone.
THAT'S IT ***

Saturday, April 20, 2013

UGLY CAKE

I've heard Sis talk about making an ugly cake but since I rarely bake I couldn't feel her pain. I felt it a few days ago.  The cake was ugly but it tasted good.

Leave it to Sunday Church gatherings to taste everyone's prized recipes.  SInce I usually opt to bring the paper plates, plastic ware, napkins or whatever else can be bought ready made, I don't  cook a dish.

JePa made a mandarin orange refrigerator cake.  Smooth, refreshing, delicious. I had to have the recipe. I was so anxious to make this cake that I googled it and selected the recipe with the ingredients she said were in her version.

Gather the crew

MANDARIN ORANGE PINEAPPLE CAKE printed from Cooks.com
1 box yellow cake mix

1/2 c. Crisco oil
1 sm. can Mandarin oranges with juice, cut up
4 eggs

Combine ingredients and beat 2 minutes. Grease and flour well two 9 inch pans. Bake at 350 degrees for 30 to 35 minutes. Cool completely. Cut layers in half crossways making 4 halves.

TOPPING
1 (15 1/4 oz.) can crushed pineapple with juice
1 sm. box vanilla instant pudding
1 lg. container Cool Whip
Beat ingredients for 2 minutes. Ice between layers, over top and sides. Refrigerate.


So far it's going pretty good.                    
I didn't have two round cake pans so I used this one long one.


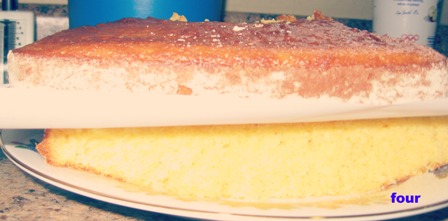
That's parchment paper between the layers so that they don't stick.
 After the cake cooled I cut it in half and then cut it again crosswise leaving me with four layers.              

I'm well aware that there is no picture five. It was a picture of the
ugly cake before it was cut.
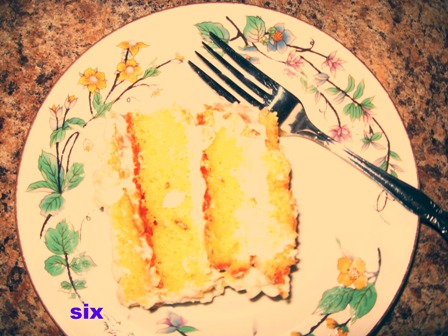
   After making the topping, I frosted the four layers and put it in the fridge. Here is a slice of the ugly cake.                         I probably shouldn't have cut the layers crosswise .  Whirling the pineapple in the blender along with the pudding and whipped topping would have made it smoother to spread.

No, I didn't eat the entire cake.

I cut the rest of the cake into slices and put them in the freezer. This will be good for those days when I want something sweet.
I plan to try this again but next time I want a Key Lime cake.

I used the Tranquil photo element at Pic Monkey on my photos. It's the same thing  they do to the camera to make aging film stars look good. There was no way it could get any worse since the cake as a whole didn't have a good side.
THAT'S IT***

Monday, April 15, 2013

BIB NECKLACE with TEE SHIRT SCARF

Feast  your eyes on all of the broken jewelry that has been given to me. Now that it has become known that I will recycle and repurpose just about anything this is where old costume jewelry comes to get a lift. 75% of what you see is from friends giving me ziplock bags of discards. I'm grateful to them for it because I enjoy trying to figure out a way to use it.

Amid this clutter was the makings of a bib necklace.  I'd planned to do a cloth necklace with some pieces I bought when Sis and I went to the Jasper Wal-Mart.  The cloth necklace didn't turn out the way I wanted but I salvaged portions of it anyway.

back and front of bib necklace before decorating
 I cut an arc from heavy cardboard and covered it with the fabric using school glue. After it was dry I put several coats of decoupage sealant on the front and back allowing each to dry thoroughly.  I took my cordless drill and placed two holes on both sides.


Be careful not to cover the holes
On the other side I hot glued trinkets from broken earrings, necklaces and etc. In the center is a fabric flower I made from some of the fabric. It looked too plain so a glued in a center.


Again, be careful not to get glue in the holes
 As added protection for the seed beads I placed a thick layer of sealant over the areas I felt were a little fragile.


If your camera says 'change the batteries', do it or else you get dusty looking pictures

Using jump rings and chain I looped the chain through each of the holes and then attached them to larger jump rings.


Things got a little out of hand because I was watching Downton Abbey
and trying to keep my hands busy.
 Attach jump rings to the fabric and t shirt and medium chain. Put on a lobster clasp and you're done with the necklace.  Yes, there's a lot on there, the fabric, the tee shirt beads, etc.

BUT WAIT THERE"S MORE!


You know I couldn't stop with just the necklace. It had to have a matching tee shirt scarf. You can  wear either the scarf or the  necklace or BOTH.

It looks like a lot but it's been doubled.
Feeling adventurous? Strut it then.
THAT'S IT***