TABLET KEEPER from an old book
While
I still enjoy the printed paper pages of a good book, technology has made it
possible to have a great number of books all in one place at the same time. Enter, the tablet, also known by other names,
e-reader, Kindle, Nook, Kobo. The list goes on.
I
recently purchased Amazon’s Fire. It arrived packed in a white box and within
the
white box was an orange box which contained the tablet. It was without directions
inside, outside or on the box. I was able to download an e-book after much
trial and error.
I
thought about how I wanted to store my new gadget. I decided I’d make a tablet
cover from an old book. After all I was planning to use it mostly for that purpose. That is until I learned how to work all of the other bells and
whistles it came with.
I
had an old book that I’d bought for 50 cents at a library book sale.
I’d
recently put it in the “Give Away” bag . The fit was perfect. I plucked it from
the bag of doom and began resuscitating
it to take on a new life.
Here
are the items I used:
Old
book
Felt
Iron
on fusion tape (I used Wonder Under)
Scissors
Hot
glue
ruler
Cardboard
Mod
podge
Foam
brush
1/8
inch elastic approximately ½ yard (depending on the size of your device. I used elastic head bands because black
elastic wasn't available)
OPTIONAL:
Items to make a book charm and clear heavy vinyl for a screen guard
1.
I started the cut of the pages out of
the book using a blade of the scissors.
Do
this very carefully. You don’t want to sever the front and back covers.
If
you’re feeling lucky, use an exacto knife. The gutted pages went into the
recycle box.
2.
I measured the cardboard and
felt in accordance with the dimensions
of my tablet.
Cardboard –one inch smaller than the tablet all the way around
Felt- one inch larger than the
cardboard all the way around
3.
Eight, one inch wide fusion tape strips
were measured and cut . They were ironed around the outside edges of the felt.
After cooling the paper was slowly pulled away leaving the filmy iron on glue. Using fusion tape instead of hot glue would
allow a smoother presentation.
4. Allow the tape to cool completely then gently pull it away from the felt.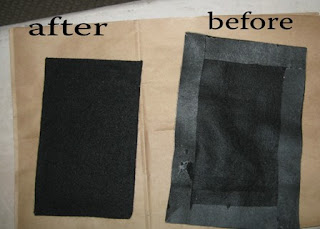
5.
left- after fusion tape was removed and pressed onto the cardboard.
right-milky residue left from iron on tape.
6.The white edges would show so I painted them with a gold metallic acrylic paint. A charm hanging from my book would also be novel (pun intended) hence the length of jewelry chain inside the spine.
After hot gluing the chain in place, I covered it with a strip of black felt. ( I didn't reinforce the spine with cardboard.I didn't feel it needed it.)
Using a medium and fine tip black marker I made decorative squiggly lines where the edges would show.
7.The elastic I had was too wide. I went to Walmart hoping I'd be able to find a package of 1/8 inch black elastic but they only had white. I live too far away from a fabric store so, I stopped in the hair accessories
department of Walmart and bought a set of black elastic headbands. 88 cents for three.
After measuring the elastic, I hot glued it front to back on one of the covered felted panels making sure it was diagonal in the front so that it could hold the tablet.
About that time I realized I didn't have a closure. That's when I hot glued one of the bands front to back on the opposite cover as you can see on the left below.
NOTE: It's better to glue the band ends of the closure tip to tip instead of overlapped. Otherwise, you'll have a hump where you overlapped the ends.
After hot gluing the panels in place inside the gutted book, here is the result.
I had some heavy clear vinyl left from a project, which I cut out to make a screen cover. That way I don't scratch it or have to look at the fingerprints when I swipe.
Here is the outside. If you look closely you'll see the book charm is a miniature of the
book jacket.
This part was mostly trial and error.
By copying and pasting a picture of the book jacket (
found online)on to a piece of card stock in a minute size, I was able to cut it out , stuff it with other minute pieces of card stock resembling pages, glue it together and seal it with mod podge. I drilled a small hole near the top, inserted two jump rings and attached them to the chain.
I'm very pleased with the outcome. It made it's debut yesterday during our book club gathering.
I'd like to connect online with other crafters and see what you've created.
END***